Low-Budget Film Lighting: 8 Simple Tips That Create Professional Results
You can create stunning film lighting without spending thousands of dollars on equipment. The best low-budget lighting comes from understanding light behavior and using affordable tools creatively.
Professional filmmakers started with these same basic techniques before upgrading their gear.
Start With Natural Light #
Natural light is completely free and incredibly powerful. Position your actors near large windows during golden hour, which happens one hour after sunrise and one hour before sunset. The soft, warm light during these times makes skin tones look beautiful without any equipment.
Place a white bedsheet or poster board opposite your window to bounce light back onto your subject. This simple trick eliminates harsh shadows on faces. You can also hang sheer curtains over windows to soften bright midday sunlight.
Use Affordable LED Panels #
Basic LED panels cost between $30 and $100 and offer excellent control. These lights are energy-efficient, stay cool, and let you adjust brightness easily. Look for panels with adjustable color temperature so you can match different lighting conditions.
Start with two LED panels for a basic three-point lighting setup (see below). Use one as your key light and another as a fill light. You can create a rim light using a desk lamp with aluminum foil shaped into a cone.
Turn Household Items Into Lighting Tools #
Your home contains dozens of useful lighting modifiers. Aluminum foil wrapped around cardboard makes excellent reflectors that bounce light exactly where you need it. White foam boards from craft stores cost $5 and work as professional bounce boards.
Shower curtains make perfect light diffusers when clipped to a frame. Black fabric or poster board creates flags that block unwanted light. These simple tools give you precise control over your lighting setup.
Master the Three-Point Lighting Method #
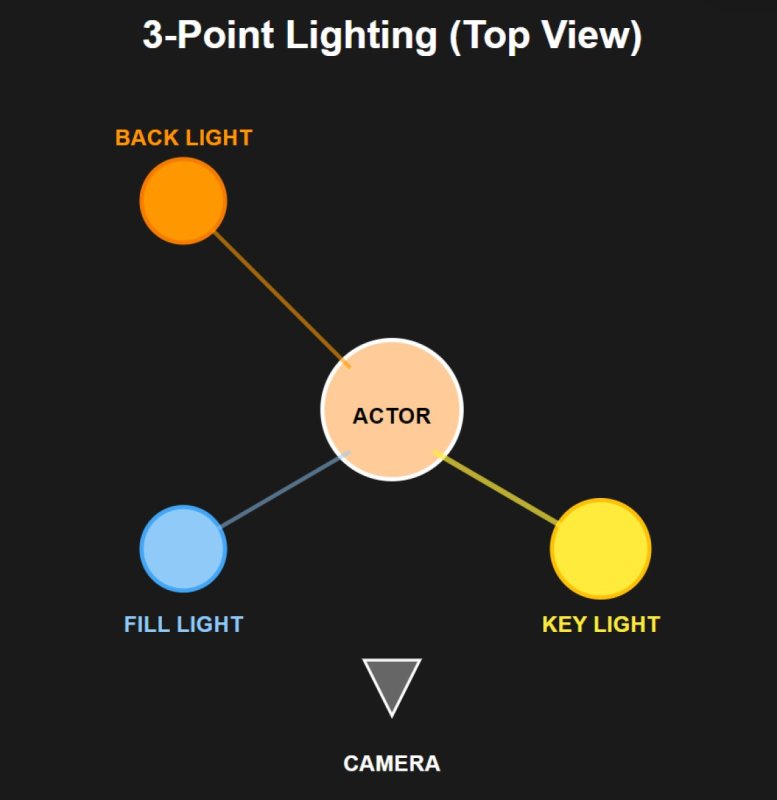 Three-point lighting creates depth and dimension in every shot. Your key light is the main light source, positioned at a 45-degree angle from your subject. The fill light goes on the opposite side to soften shadows without eliminating them completely.
Your backlight separates subjects from the background by creating a subtle rim of light. You can achieve this with a small lamp positioned behind and slightly above your actor. This basic setup works for interviews, narrative scenes, and product shots.
Control Your Light Direction #
Direction matters more than brightness when creating mood. Side lighting creates drama by emphasizing texture and shadows. Front lighting flattens features and works well for comedy or bright scenes.
Backlighting creates silhouettes and mysterious atmospheres. Top lighting can look unnatural but works for specific horror or dramatic effects. Experiment with different angles using a single light source before adding more lights.
Work With Color Temperature #
Different light sources have different color temperatures measured in Kelvin. Daylight measures around 5600K and appears bluish, while tungsten bulbs measure 3200K and look orange. Mixing these temperatures creates muddy, unprofessional-looking footage.
Match all your light sources to the same color temperature using colored gels or LED settings. Orange gels warm up cool LED lights, while blue gels cool down warm practicals. Consistent color temperature makes your footage look polished and intentional.
Use Practical Lights Creatively #
Practical lights are any light sources visible in your frame, like lamps, candles, or phone screens. These add realism to scenes while providing actual illumination. Replace standard bulbs with daylight-balanced LED bulbs to match your other lights.
Dim practical lights using dimmers or by placing them on lower-wattage circuits. Add your own hidden lights nearby to boost the practical's effect. This technique creates natural-looking scenes that feel lived-in and authentic.
Learn From Watching Films #
Study how professional films use lighting in scenes similar to yours. Watch with the sound off and pay attention only to light placement and shadow patterns. Take screenshots and recreate these setups with your own equipment.
Notice how different genres use different lighting styles. Horror films use hard shadows and underlighting. Romantic comedies favor soft, even illumination. Analyzing professional work teaches you techniques faster than any tutorial.
Your Next Steps #
Start with one light source and master it completely before adding more lights. Practice controlling that single light's direction, intensity, and quality. Most amateur mistakes come from using too many lights without understanding the basics.
Build your lighting kit gradually as you identify what you actually need. Rent expensive equipment for special shots rather than buying gear that sits unused. The best investment is practice time with whatever lights you currently own.
Great lighting comes from understanding principles, not owning expensive gear. These low-budget techniques let you create professional results while developing skills that translate to any equipment level.
Comments
No comments yet. Be the first to share your thoughts.
Log in to join the discussion.